Wednesday, December 22, 2010

Oriental Butterfly Cross Stitch Complete!

Look, this one even has a frame! I made this as a housewarming/birthday gift for a good friend who has spent the better part of the last couple years building her first home. I did the stitching and my boyfriend and another friend shared the cost of the framing for the piece. Last weekend we were finally able to give it to our friend, so now I can post pictures without ruining the surprise.

The lighting was terrible when we took the photos so you'll have to trust me that the piece looks absolutely gorgeous in the frame. The matte board is a suede matte in a lighter shade of brown than it appears here and it really helps to make the picture pop.

Below is a somewhat more wrinkled picture of the cross stitch that I took before the framing was done. The lighting was better here and you can get a truer sense of the colours. The pattern I was using is called Oriental Butterfly and it was published by Dimensions. I searched every inch of the leaflet, but I was unable to find a designer's name anywhere. It's a shame because I do like to give credit where credit is due.


I used the original counted cross stitch version of this pattern, but Dimensions has released several other variations on the design. I've seen it sold in kits and as a stamped cross stitch set, where you only have to stitch the central part of the design and the Chinese characters and shading are pre-printed. The version I have doesn't seem to be in print from Dimensions currently, but they do sell this very similar Oriental Butterfly design. I'm not sure what prompted the changes.

On my piece, everything was stitched. It was quite an interesting pattern because it uses a lot of different types of stitching. The number of strands you use also varies between 1-5 to help achieve the textures and shading of the final design. Hopefully in this picture you can see that the background is composed of slant (or 1/2 cross) stitches while the foreground elements like the butterfly, coin and chopsticks are made using regular cross stitches.

I didn't use anything too fancy for the fabric here. Since it's mostly covered up by stitching, I made the piece on an 18 count cream aida cloth.


Two close up shots of the butterfly and it's beautiful colouring. The top picture was taken before the piece was framed and the bottom one was taken after. In real life the butterfly still looks just a bright now that it is framed. Here, it's just problems with the camera and light reflecting off the glass changing the colours. Still, I liked the second picture because I thought it showed the stitching a bit more clearly.


Overall, I love this design and I'm really happy with how the finished, framed piece turned out. It was time consuming, but the variety of stitches kept the work interesting. I'm so happy I purchased the leaflet for this one because someday I may go back and make another one of these for myself.

Tuesday, December 7, 2010

Mouth of the Flower - Complete!

You'll have to excuse the wrinkles in this one. I'm not sure when I'll get a chance to have it stretched and framed, but since it was newly finished I was eager to show it off. This is Octavio Ocampo's Mouth of the Flower, the companion piece to the Family of Birds cross stitch that I completed in October. I was right about this one being a lot quicker to stitch. I attribute that to the wonderful flower stems, which are only 3-5 stitches wide and take far less time than an entire tree trunk to stitch up.

I mentioned before how the women in the pictures reminded me of Francine and Katchoo from Terry Moore's wonderful Strangers in Paradise. This lady is the one that's reminding me of Katchoo, while the other one struck me as sharing similarities with Francine.

I wasn't the only one who thought so either, after finishing the Family of Birds piece I contacted Terry Moore via his blog and was lucky enough to have this brief email exchange with him:

Hi Terry,

Not sure if you are familiar with Ocatavio Ocampo's artwork or not, but I made this cross stitch because the picture reminded me of Francine from SIP. Thought you might like to have a look:


Wishing you all the best,
Amber

***

Thanks Amber. I see her too.
T

I said it was brief, right? That's okay. I know Terry is a busy man and I'm very excited and appreciative that he took the time to respond.

And now just a few close-up shots so you can see some of the stitching in this picture. Of the two designs, this one is my favourite. I really like how vibrant the colours are and it was a lot of fun to stitch because the individual elements are relatively small. In most cases I could get a particular part of the picture, such as the butterfly or a flower, done in a single day and really feel like I was accomplishing something.


This butterfly, which also acts as the woman's nose, is the only part of the picture that has any backstitching. I really think it's amazing that this piece can look so detailed, without being backstitched everywhere.

And now I'm not sure what I'm going to make next. I have been working on a few crochet items for Christmas, but since the gift recipients read Cthulhu Crochet and Cousins I won't be able to post them until after the holiday season. I'll also have to browse through my cross stitch library and see if I'm feeling ambitious enough to start another piece.

If anyone is interested in making these patterns for themselves the patterns and fabric are available through Loving Stitch's online store, and I imagine a few other online cross stitch retailers. The only difference is that I opted to stitch my pieces on a 32 count cream belfast linen, rather than the lavender recommended in the pattern.

Monday, November 1, 2010

Browncoat Christmas Ornaments - With Free Patterns!

This holiday season you can show off your Christmas spirit and your Browncoat pride at the same time. I wanted to design a quick and versatile Christmas craft project that would be a good homemade gift for my Firefly loving friends and also a nice piece of subtle geekery to add to my own holiday decorating. After rejecting a couple of other ideas I think these cute little guys sporting their Jayne hats have hit the mark.

Made on 7 mesh plastic canvas these ornaments are about 4 inches tall by 2.5 - 3 inches wide and each one would probably take about 2-4 hours to stitch up, depending on your stitching experience.

They're perfect for hanging on the Christmas tree or attaching to presents as a gift tag. I'm going to post the directions here for how to make the ornaments on plastic canvas, but feel free to take the gridded patterns and let your imaginations run wild. The patterns could also be used to make these little guys in cross stitch, fuse beads, knitting, crochet or anything else you can think of. And if you do come up with a clever way to use the patterns, feel free to send me a picture or a link to somewhere that you've posted your creation online.

(Clicking on the patterns should cause them to open a new window where they will appear somewhat larger on most browsers. Then you can print them or save them to your own hard drive.)


Materials

(Note: While I haven't taken an exact measurement, I would estimate that you will need approximatley 10 metres or less of the dominant colour in each design, and 3-6 metres of the other colours. These take very little yarn and are ideal for leftover bits from previous projects.)
  • small amounts of worsted weight yarn in the colours shown in the pattern grid.
  • Black embroidery floss (DMC 310)
  • White embroidery floss (for Gingerbread man only)
  • 7 mesh plastic canvas
  • No. 16 or No. 18 tapestry needle (blunt is preferred)
  • scissors
Directions
  1. Cut the plastic canvas into a smaller rectangle that is 2 squares wider and 2 squares longer than the ornament you're planning to make. (For example, the penguin is 17 squares wide by 28 squares high, so to make him you would cut a piece of plastic canvas that is 19 X 30 squares).
  2. For all squares indicated on the graph, cut two pieces of yarn in the appropriate colour and stitch in continental stitch.
  3. Begin stitching with the four yellow squares in the centre of the Jayne hat in the centre of the top row on your plastic canvas. Work downward from this central starting point. Weave ends in on back of the piece when changing colours.
  4. Once all of the continental stitching is complete, switch to embroidery floss. Cut floss and do not separate into individual strands. Use the 6-strand piece to backstitch the thin black lines on the grid. (Use white floss to backstitch where indicated by thin white lines on the Gingerbread man grid.)
  5. Use scissors to trim the ornaments leaving a line of plastic canvas around the outer edge of all your stitches. Refer to top picture to see how ornaments are cut.
  6. Cut an 8 inch piece of embroidery floss, separate into individual strands. Thread one strand through top centre of ornament and knot to create loop for hanging.
As always, feel free to post a comment or contact me through the blog's email address if you have any questions about the patterns. I'll do my best to help you out.

Enjoy!


Sunday, October 24, 2010

Australia Bound

Each year I try to send a couple of handmade toys to help out the Softies for Mirabel campaign in Australia. Toys donated to the cause are given out at Christmas time to children whose families have been affected by substance abuse. In the past the organizers have told me that it is often more difficult to find suitable toys for the boys.

Hopefully these Cuddly Cthulhus will appeal to a couple of the boys. After all, who doesn't like a good set of tentacles? The elephant in the middle comes from Tammie Snow's Tiny Yarn Animals. I made it a while back when I was testing out some of the patterns so I could review the book.

Click the link to learn more about the Softies for Mirabel 2010 campaign. Scroll down that page and you'll also see the mailing address where you can send your own donations if you're interested. Having donated for three years running, I'm always surprised to find it actually costs less for me to mail a package of these amigurumis to Australia than it does for me to mail the same size package to another part of Canada. So far the shipping has always cost me less than $10 Cdn., which I think is pretty reasonable.

Friday, October 22, 2010

Corrections to Cuddly Cthulhu Pattern

I wanted to let everyone know that I've corrected some problems with the head portion of the Cuddly Cthulhu pattern.

I was remaking the Cuddly Cthulhu a few days ago and realized that the head instructions were less than accurate. Some lines were missing causing the head to come out much stubbier than I had intended. Following the directions in the pattern will now result in a cthulhu head that looks much more like the one in the sample picture I've posted here.

The head directions have now been changed from Rnd 8 onwards to the end of the head.

Sorry for any inconvenience this edit causes. If you prefer the cthulhu with a stubbier head, work the head directions, omitting rounds 8,9,10,11, and 18. And as always, feel free to post a comment or send me an email if you have any question.

Tuesday, October 19, 2010

Family of Birds Cross Stitch Completed!

And this is why I haven't been blogging much about my own projects lately. For the past three months I've been finishing this cross stitch. It is Octavio Ocampo's Family of Birds, and as you can see from its wrinkled state, it is very recently finished. I've just started working on its companion piece, Mouth of the Flower, so I'm going to hold off on stretching and framing until I have both pieces done. Hopefully the next one will go a bit quicker. The tree in this piece took forever, and I think I'll be quite happy if I don't have to cross stitch anything brown for a very, very long time!

I saw both of Ocampo's pieces stitched up in a local cross stitch store a few years back, and every since I first saw them they've reminded me of Francine and Katchoo from Terry Moore's wonderful Strangers in Paradise series. That's the first comic book I ever got really into and started collecting, and it's still one of my favourites to sit down and reread from beginning to end. I actually thought there was an issue where Moore had drawn the women in an optical illusion way similar to Ocampo's picture, but I haven't been able to find it. I think my brain is just misremembering this line drawing of Katchoo from the I Dream of You graphic novel cover and mixing it with Ocampo's work. Nevertheless The Family of Birds looks like Francine to me and the Mouth of the Flower reminds me of Katchoo.

Aside from the lengthy time I spent on the nuances of brown in the tree trunk this was a really fun picture to stitch. There are 29 colours in this one and lots of blending. Though, interestingly no blends in the Mouth of the Flower companion piece. It's also all full cross stitches, so no messing round with 3/4 and 1/4 stitches. And there's a very minimal amount of backstitching, which always makes me happy! I stitched the piece on a 32 count cream belfast linen rather than the lavender colour recommended in the pattern because I thought it helped with the illusion of the picture either being a tree and birds or a face. Where as, with the lavender, I felt like you more dominantly saw the face.


A word of caution to anyone who does want to try this picture. Have the fabric cut about 5-6 inches wider and longer than the pattern is recommending. I followed the patterns recommendation and I just don't feel like it left me with much room around the edges for framing. I usually like to have a blank edge on all sides of about 3-4 inches, and after the piece was done I was left with edges that only had about 1.5 - 2 inches of space. Hopefully my framing store will be able to work their usual magic anyway, but I would have liked to have left them with more to work with.

Sadly my local cross stitch store went out of business last spring and took their business online. The link I've provided in the top paragraph will take you to Ocampo's cross stitch patterns in their online store. The patterns are also available from a number of other cross stitch stores in the real world and online, if you wish shop closer to your hometown.

Thursday, October 14, 2010

Quick Stitch Halloween Costumes with Free Patterns!

Remember those horrible plastic Halloween masks of the 80's that attached around the back of your head with an elastic band? Remember they had little holes cut out for your eyes and always looked creepy no matter how cute the character they were based on happened to be? I still have nightmares about the plastic Care Bear mask I wore one year... Thanks goodness we've moved beyond those things. Or at least have the ability to do so. Last month I suggested crocheting up a Futurama brain slug as a quick costume idea. That got me thinking about what other crochet and knitting projects you could whip up for a quick costume.

First up, you can show your love of all things Katamari while keeping your ears warm with Nikol Lohr's Katamari Prince Earmuffs. Just click the link to view the free pattern, courtesy of Shojo Beat magazine.

And of course this wouldn't be Cthulhu Crochet and Cousins without a mask of our favorite Lovecraft monster. This cthulhu mask was crocheted by flickr user djonesgirlz. No formal pattern, but djonesgirlz does give a link to the original ski mask pattern that was modified to make this awesome monstrosity and an explanation of how the tentacles were created.

Craftster user mamaedgar's son really wanted to be Yoda this Halloween so she whipped up this Yoda hat for him in just two days. I'm impressed! That's a lot of stitching in just two days. Click the link to see more photos and the free pattern that mamedgar was gracious enough to share. I really admire the detail on this one, including the bits of fluffy hair around Yoda's ears. Nevermind, Halloween, this hat would be great to wear anytime. Of course, the original pattern was designed to fit a four year old, so some alterations may be in order if you want it in an adult size.

Running short on time, or just a beginner? Here's something a little simpler that could still be part of a pretty awesome costume. Just add a sword to this traditional masquerade mask, created by Priscilla Hewitt and you could be Zorro, or deck it out with some sequins or beads for something a bit more flashy.


Sadly, these last two masks aren't available as free patterns, but I liked them so much I decided to include them anyways. I'm guessing that more experienced stitchers will be savvy enough to figure out how to make these, or at least something pretty similar. First up, start practicing that gravely Christian Bale impersonation so that you proclaim yourself Batman while wearing a crocheted cowl, like this one stitched by Etsy user nmelone13.


And last, but not least, Dr. Zoidberg courtesy of another Etsy user, blackfezstudios. I absolutely love the eyes and the colour of yarn that was chosen for this one. It makes for a very realistic Dr. Zoidberg!

Sunday, September 26, 2010

Futurama Coasters and More!

I promise I won't be renaming the blog Futurama Crochet and Cousins anytime soon. It's purely coincidence that we've got two Futurama posts in a row. I think the joy of having new Futurama episodes on TV for the first time in years has been pretty inspiring for a lot of geeky crafters.

First up are these awesome coasters created by Craftster user zombiecakeses. Whether you call them Hama beads, Perler beads or Fuse beads, they work in the same manner. Create a pattern on a peg board with the beads, iron the beads so they melt slightly and stick together, then remove the peg board and you have your wonderful pixelated creation. Search online or look in local craft stores or the crafting aisle of major toy stores for the beads. In stores they usually come in a mixed bag of colours, where as online you can usually order bags of a single colour. You can also check out my Perler Bead Tutorial if you want more information on how to create patterns.

I love these coasters, not only because they are Futurama, but also because they aren't 16-bit video game characters. Don't get me wrong, I love my Mario Bros. and Pac-Man, but for a while it just seemed like that was all anyone was making with fuse beads. It's nice to see someone branching out to make more modern-day pop culture icons. Now I wonder if I have enough gray to make that Bender head...

I also wanted to share this work-in-progress because the brilliance of the idea blew me away. Craftster user heatheres76 is converting an old Clue game into a Futurama Clue game. Here you have the little game board pieces which she has sculpted herself. The brain slug is one of the weapons, not one of the playable characters. I can't wait to see what the other weapons turn out to be. I'm casting my vote for Torgo's Executive Powder. What would you suggest?

Thursday, September 2, 2010

Time To Switch to a Garlic Shampoo

New episodes of Futurama and the appeal of having a really cheap Halloween costume have caused a brain slug epidemic around our house. My boyfriend, who is both wise and witty, appears to be the first victim, but what's really scary is the number of people I have lining up and asking how they can get a brain slug of their own.

If you're the crafty sort you can crochet your own using this terrific free pattern from Hook & Needles. To attach the brain slug to the head I poked a small wire hairband (Dollar store purchase!) through the base of the piece. I thought I'd have to glue it in place so it wouldn't slip around when someone's wearing it, but surprisingly it actually stays put. What can I say. those brain slugs are clingy little devils! The eye was made using a piece of white crafting foam that's adhesive on the back side. Rather than attempting to cut out a very tiny black circle, I just cut open a googley eye and used the black pupil from that.

We were joking that it would be fun to carry around a prop bottle of garlic shampoo when one is wearing a brain slug. Simple enough to make, just put a new label on any old bottle of shampoo. Then I did a little Googling and discovered that garlic shampoo is a real thing. It turns out that aside from combatting the tenaciously clingy brain slugs, garlic shampoo also aids in preventing hair loss. Huh, who knew?

Tuesday, August 31, 2010

Everybody Needs Minions!

If you haven't seen Despicable Me yet this summer, you really should. It truly is a lot of fun. One of those great movies that's good for all ages. Keeps you laughing, but has a bit of heart too. Of course, I'm still torn as to whether or not the minions were the best part or if it was the adorable little girls that our evil main character is forced to take in.

While watching the movie I couldn't help thinking that those minions would be pretty easy to recreate in crochet. WolfDreamer beat me to the punch though in actually converting that thought into a pattern. Click the link to check out the free pattern, which even includes a few tips at the end on how to make a nice variety of different minions. Because if you're going to rule the world, you're going to need more than one minion.

Tuesday, August 17, 2010

Slicker Brush Revisited


I've been having fun with my new slicker brush and I thought readers might enjoy seeing the results. Here are three patterns that I've made before, now re-crocheted and brushed out with the slicker brush. All three fluffy amigurumis were made using various shades of Vanna's Choice worsted weight yarn. As you can tell from the pictures I've got a lot of grey yarn to use up.

Above you see the Owl pattern from Ana Paula Rimoli's Amigurumi World: Seriously Cute Crochet crocheted regularly on the left and then crocheted and brushed out on the right. Below is the Bunny Ami pattern from the same book.


The koala comes from Tamie Snow's Tiny Yarn Animals.

I managed to brush out all of these without ripping any holes in the crochet so my technique is getting better. However, I did learn the hard way that you should always put in the safety eyes after brushing the stitching. I forgot and put in the koala's eyes before brushing and it was quite the challenge to brush around them. You can't see it in the pictures, but his little black eyes have been scratched up pretty badly by the brush.

And what will I be doing with all these fluffy critters? I gave the white owl to my grandma who is a collector of owls and was the recipient of the owl on the left a couple of years ago. She could hardly believe it was the same pattern, as the brushing gave it a totally new look. As for the other two, they may be donated to charity or given away as gifts. I haven't decided yet.

Did you see my first slicker brush project? If not, check out Penny the Penguin.

Tuesday, July 27, 2010

Spring Cat Cross Stitch Completed!

When I wasn't working on Firefly cross stitches this is the major project that has been keeping me busy for the past few months. It is called Spring Cat and was designed by Sherrie Stepp-Aweau. I started working on this in February and managed to get it finished by June. Not a bad stretch of time I would say.

It's a birthday/Christmas gift for my Mom which we were able to give to her on the weekend. I did all the stitching and the boyfriend, who is both wise and witty, helped cover the costs of getting it professionally stretched and framed. Needless to say my Mom was very happy with it. Her cat, who happens to look like the kitty in the picture, was also intrigued. He stared into it's eyes for a good solid minute, started to quiver and even frizzed his tail at it. Once it's hung on the wall I'm sure my Mom's either going to encounter him meowing at it and trying to make friends or hissing and spitting at it.

I stitched this on a black 18 count aida cloth, and thankfully most of the black space in the picture is just the fabric showing through, which cuts down the number of stitches I had to make. The border with its many open spaces was truly a lot of fun as it seemed to go by very quickly...Look I'm done one side...Look I'm done another. There's also a minimum amount of backstitching which makes me very happy. The finishing off backstitching always makes a picture pop and look wonderful, but it's my least favourite part of any design.

I have the pattern in a leaflet from Cross My Heart that also includes the Summer Cat. Unfortunately I'm fairly certain the pattern is out of print now, even though you can find a couple of the designer's other cat patterns at PatternsOnline. I managed to snag the last copy from my local cross stitch store and all the supplies I needed to make this, only a few months before it went out of business.

Saturday, July 24, 2010

Not a Dinosaur!

My boyfriend, who is both wise and witty, is obsessed with dinosaurs, and while I'm not the expert he is, I think they're pretty great too. So we were both really excited to hear that June of PlanetJune had reached 1o0 sales with her first set of dinosaur patterns and was releasing a new set of three in celebration.

The boyfriend, who appreciates accuracy when it comes to all things dinosaur, was also impressed that June had done her research and knew, "neither Plesiosaurs nor Pterosaurs are actually dinosaurs! The term ‘dinosaur’ correctly covers only a certain type of terrestrial reptile with an upright stance, so Plesiosaurs and Pterosaurs are simply related reptiles that lived in the same time periods as the true dinosaurs."

That sold us and here before you is Pterry who was made using June's wonderfully easy to follow Pteranodon pattern. For this one I used Vanna's Choice Baby Yarn in Little Boy Blue. Later I'll have to make a smaller one in a variegated Kroy Sock yarn so that our stegosaurus can have a matching friend.

Want the Pattern?

The Pteranodon pattern is available as a pdf download from the PlanetJune Store for $5.00 U.S. or you can save money by ordering the new set of 3 dinosaur patterns for $12.50 U.S.

Monday, July 19, 2010

It's so Fluffy!!! My First Slicker Brush Project...

I know penguins are a little out of season for July. Maybe if you're sitting somewhere hot right now then just seeing this sweet little guy will help cool you down. This is my first crochet endeavor made using Roman Sock's Brushed Crochet technique and I am so happy with the results. Would you believe this yarn is just Vanna's Choice brushed out with a pet slicker brush? At first I wasn't sure if it would work, but as you can see it turned out pretty fluffy!

I accidently got a little carried away and brushed the body so vigorously that it tore a couple holes in the crochet. Ironic since the body was the last piece I brushed. You'd think I'd have been more likely to damage the first piece. Overconfidence, I guess. The wings are set a bit further back on the body than I would have liked so they cover up the holes and so I could use the attaching yarn to sew the holes shut. I wouldn't want poor Penny leaking stuffing everywhere.

The pattern comes from Brigitte Read's (aka Roman Sock's) amigurumi book Super-Super Cute Crochet . I borrowed this one from a friend for a while, but it's definitely on my "to buy" list. There are a lot of designs in here and the photography is wonderful, showing most of the animals from several different angles. That's always an asset when you're trying to figure out the placement of wings, limbs or tails. Many of the patterns are the ones that Roman Sock sells individually online, but there is some new stuff here as well.

I was also pleasantly surprised to find out that not all the patterns in the book are brushed crochet. There are some terrific regular crochet amigurumis in here like this dragon. In hindsight I wish I'd crocheted his legs (yep, those are legs sticking out at the front) in the same colour as the body rather than using the iridescent cord I used for his spikes. Ah well, next time. He's pretty cute this way too, just a little stranger looking.

In the book the dragon is red and green and described as a being similar to a Chinese Fire dragon. I'm thinking of mine more as a water dragon. The body was crocheted using some of the James C. Brett's Marble in Amethyst I had leftover from this afghan.

Tuesday, July 6, 2010

Firefly Patterns in Action

I thought this would be a nice follow-up to yesterday's post. Here for your viewing pleasure are two crafty projects that were made using the Firefly character cross stitches that I designed.

To the left is a Firefly bag that Paula made for a Firefly-themed swap on Ravelry. I have to say, she has a very lucky swap partner! I'm definitely putting a bag like this on my wish list.

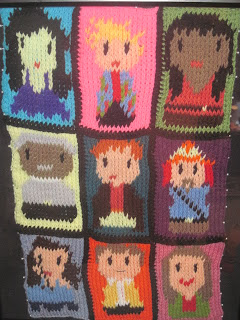
Pictured below is a Firefly afghan stitched up by Happyhooker. This was made using the Tunisian style of crochet and I have to say I'm in awe of anyone who finishes a large project in tunisian. It took me over two weeks to finish a single square for a large project I'm planning and I haven't gone back to it since...

You can see the patterns lose a bit of their detail when converted to crochet, but the characters are still recognizable. It looks cozy and who wouldn't want to curl up with this band of bad guys!


A bonus project! I discovered this one when I was checking out happyhooker's blog. Want to make your own crocheted Serenity? Of course you do! The patterns available free here. Thanks happyhooker for creating this one and posting it to share with everyone.

Monday, July 5, 2010

Firefly Fundraising Success!

Readers may recall that I was donating some of my Firefly cross stitch pieces to various Can't Stop the Serenity screenings throughout Canada.

After successful screenings in Vancouver, Edmonton and Toronto, I can now happily announce that my cross stitches raised a grand total of $438 for Equality Now and the other sponsored charities in each city.

To say I'm overwhelmed by this total would be an understatement. I'm in awe of how generous my fellow Browncoats were in their bidding and really pleased that my cross stitch pieces were able to bring in this much money for our charities.

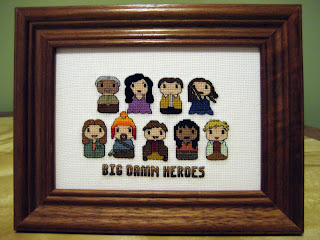
The Big Damn Heroes cross stitch above was the highest seller. It was in the auction at our Vancouver screening and went for $110.

Also at the Vancouver screening, this Wash piece sold for $85 and the River one went for $63.

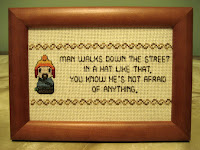
Here in Vancouver Jayne was paired with a Jayne Hat tea cozy and sold for a total of $60. The Jayne cross stitch that I sent to Toronto was included in their Jayne package which also contained a Jayne Hat pin and Blue Sun T-shirt. That package sold for $80.

Edmonton had a smaller screening than the other two cities, with just under 100 people in attendance. They were pleased to raise $40 through the sale of this 3 character Big Damn Heroes cross stitch.


I wanted to share how well each piece did in case there are any other crafty Browncoats out there who were thinking of making something for a screening in their area later this year or even next year.

In general supplies for each piece cost me under $15 each and all the pieces I made earned far more than what I put out on supplies and shipping. As to the time I spent stitching and framing, I consider that my donation to the cause.

So if anyone is on the fence about making something like this for their own charity screening, I highly recommend it. All three organizers told me that the unique homemade items are always a high seller at their auctions.

In closing, another big thank you to everyone who bid on these pieces and to everyone who provided me with feedback about the designs through the blog, on Craftster or in person at the Vancouver screening. To anyone interested, the patterns for cross stitching the Firefly cast members are all available free on the blog under the My Free Patterns heading.

Enjoy and stay shiny!