Friday, May 30, 2008

MST3K Earrings! Cute Thing of the Week

The best I can make with Polymer clay is snails and snowmen so I'm pretty much in awe of people who can sculpt tiny detailed pieces like these awesome Tom Servo and Crow T. Robot charms. The Clay Collection sells these little guys as well as a Gypsy and Satellite of Love charm, and as she explains in her store profile:

"You can consider any piece from a set of earrings as a charm individually. It can be mixed and matched, made into a pin, a ring, put onto cuff links or a key chain, combined with other charms to be put on a charm bracelet, used as a cell phone, purse or zipper charm or can be strung on a chain for a necklace."

The pair of earrings sells for $12 and a set of all four Mystery Science Theater 3000 themed pieces that can be used as wine glass charms is $20. (Wine glass charms also make excellent knitting stitch markers!). If you're a child of the 80's you'll definately get a kick out of browsing around The Clay Collection which also features lots of great video game and memorabilia related charms.

Thursday, May 29, 2008

Creepy Cute Crochet. Approach with Caution...

Waiting for Christen Haden’s Creepy Cute Crochet to be released I think I was a bit like a kid waiting for their first trip to Disneyland. I built it up so much in my mind that I was bound to be disappointed by the actual product when it arrived. I’ve always been a big fan of Haden, aka NeedleNoodles. It was seeing her Cthulhu on Etsy that inspired me to design my own Cthulhu pattern and from there I’ve gone on to a number of other ambitious projects.

I don’t want to give the impression that this is a bad book. It certainly isn’t bad, I just think it might not be what people are expecting. If you’re fortunate enough to be able to browse through the book in store before buying it, I highly recommend you do so.

The book features 21 different creepy critters, but that doesn’t mean you’re actually getting 21 patterns. That’s where I think the product description is a bit misleading. What you’re actually getting is one pattern for a basic head and body shape, and 21 different variations that you can do to this body shape. The variations may include only minor changes of wool colour or whole extra pieces such as hats, vests, or headdresses that you need to crochet. Haden also provides a basic description of how to make fringe hair, clay eyes and props for some of the critters.

I think the main problem that I have with the book is that the way things are done often doesn’t make sense or isn’t the easiest way it could be done. In other places I found the instructions rather vague and it was frustrating to try and figure out what I was supposed to be doing.

Looking at the pictures, the heads on the critters seem perfectly round, but when you actually make them what you end up with is a more oblong, oval shape. Unlike typical amigurumi the increases aren’t done in a basic multiple either, such as starting with a round of 6, then increasing to 12, 18, 24, etc. Instead the increases are random and I find they actually make the head come out a bit lopsided.

I should also note that Haden makes most of the pieces in this book by slip stitching at the end of each round to join and then beginning the next round with a chain 1 and single crochet in the same space. I personally can’t see any reason why the critters couldn’t be done using the more common spiral rounds method that most people use for amigurumi and I found the joining and chaining tedious.

The photos in the book make it feel more like a coffee table book of crochet than a pattern book. I’m not sure who to blame here? The photographer? The publisher? Whoever it is seems more concerned with making an artistic photo than a useful photo that will help the stitcher understand what they’re supposed to be doing. There is one group shot of all the creatures and then each creature gets one large photo at the beginning of its pattern pages.

I would have liked to have seen more pictures from more angles. Especially for the Cthulhu it would have been nice to have a photo of the back so I could see exactly what the wings look like and how to place them.

More pictures or even hand drawn diagrams would have also helped in places where the instructions are hard to understand. For example, in the Corporate Zombie pattern it says “stitch one piece of hair fringe in a zigzag along side of head.” Having made this creature I still have no idea what that means and I ended up improvising. A picture probably could have made that clearer.

Haden includes instructions in both written form and charts and there are directions here for special stitches she uses in the book. In fact, this is the first time I’ve ever seen the magic ring outlined in an amigurumi book so points for that! However, I wouldn’t recommend this book for a beginner. I think it’s too complicated and it doesn’t provide instructions for basic stitches such as the single crochet or double crochet. It just assumes you already know that much.

This book would be suitable for an intermediate stitcher. To make these patterns you need to know your basic stitches and have the confidence to improvise when the instructions get confusing. Since it shows a wide variety of designs you can create from one basic body shape it’s probably a nice bridge for people who are ready to go from following other people’s patterns to making their own.

If you’re already an advanced amigurumi maker, and you can design your own head and body shape, then there probably isn’t much you can learn from Creepy Cute Crochet. To give the book a fair review I made my first two critters following the instructions in the book to the letter, but I know that in the future when I refer to it I’ll be improvising as I go; stitching in spiral rounds, changing the head shape slightly and making other alterations so that I can stitch the head and body all as one piece rather than sewing them together later.

Finally, I have to say that even though I have some quibbles about the book, Haden has come up with really awesome designs here. The book truly lives up to its name of creepy cuteness. Out of the 21 critter there are only about 5 here that don’t really appeal to me. I don’t know about you, but it’s not often that I pick up a pattern book and like more than 50 percent of the designs in it.

I’m curious what others think of this book. If you’ve bought it post a comment and let me know what you think.

My other Amigurumi book reviews:

Amigurumi Word. My thoughts...

Mr. Funky's Crochet Elephant

Monday, May 26, 2008

My Market Bag

If it can hold Nibbler this bag should be able to hold anything, right? I've been working on this for the past couple weeks using this free pattern from Lion Brand. I feel like I've been spoilt by amigurumi lately and now anything that takes more than three hours to make feels like forever...Really, two weeks to make a market bag probably isn't that long and I'm pretty happy with how it turned out. I messed up a bit in the rows that decrease towards the strap and had to compensate by making the strap a little longer than the pattern suggests. I take full credit for the mistakes though. The pattern is quite simple and I highly recommend it for anyone who wants to make a first attempt at bag making.

The wool I used was Lion Brand microspun in Lavender and Lilac. It's probably a bit expensive for something you're going to tote around to the market, but I'd already bought it months ago because I liked the feel and the colours. Besides, it's unlikely my bag will ever actually make it to the market. My intention was to make something that I could carry crochet projects around in. And yes, truth be told, I already have two other bags for that purpose, but somehow they've found themselves stuffed full of wool I've bought for future projects so it was time for another project bag.


The less exciting empty shot of the bag so you can see the shape of it. The whole thing is made with double crochet stitches and then has a row of single crochet trim around the edge.

Friday, May 23, 2008

Corporate Zombie! Cute Thing of the Week

Here is the first project I've made from the new book Creepy Cute Crochet by Christian Haden. This little guy is for my boyfriend, he who is both wise and witty. He wanted a little creepy creature to sit on his desk at work. This was also my first attempt at making hair. I followed the instructions in the book, but it came out a little thin on one side. Oops! We're just going to tell people he lost some hair while fighting the other zombies.

I want to make a couple more critters from the book before I write up a full review of it. I will say I was surprised by how small the projects are. The zombie stands 4 inches tall and is only about 2 inches wide. A few of the other critters may be taller, but not by much. It makes them the perfect project for when you want to make something you can finish in one or two hours.

Wednesday, May 21, 2008

Art and Craft

Cateus made this incredible tree by cutting up two plastic Coke bottles into very fine string string and then crocheting them. On Craftster she explains that it's part of a major project she's working on right now "to a theme of recycling and the damage desposable products are doing to the earth." Personally I just love when people take items that would normally be considered garbage and manage to turn them into something beautiful. I think seeing something like this really inspires people to look at the world around them and think about how they can reuse things rather than just letting them clog up a landfil.

When I first saw this Coke bottle tree it reminded me of a Brian Jungen exhibit the boyfriend and I saw at the Vancouver Art Gallery a couple of years ago. Jungen's work also has an environmental message as he takes items that are mass produced and turns them into scupltures often depicting cultures or creatures that are dying out because of that same mass production. Here are a couple samples of his work that I really like. If his show ever visits an art gallery in your area, take the time to go. It's worth seeing these up close.


Protoype for New Understanding #5 by Brian Jungen. Made from Nike Air Jordans and human hair, this is just one in a series of masks Jungen has created.


Shapeshifter by Brian Jungen. This one is made from plastic lawn chairs. When you're at the exhibit you can actually walk right up and stand under this piece. It's then that you notice Jungen has left the price tags on some of the chairs. It's a bit jarring to think you're looking at a whale skeleton and then notice the Canadian Tire stickers on some of the bones.

Tuesday, May 20, 2008

Ten Top Tutorials

I thought I’d do something a little different today. Consider this page a bit of a reference tool, with links to ten free tutorials that I really like. Some of these I’ve used only once, some I’ve returned to again and again, and some I’ve bookmarked for future projects. I’m not going to number them like a formal Top Ten list because there’s no best one here, they are all the best at what they do. In each case I think the person that took the time to make them did the best job of explaining the concept clearly and I hope that you’ll find them as useful as I have.

Tutorials

* The Magic Ring - For amigurumi or any project that involves circular crochet with a base chain of more than four stitches the Magic Ring is my favourite starting tool.

* The Yellow Ball (Part 1 and Part 2) - If you’ve never tried amigurumi before this is the place to start. Approximately 18 minutes of video during which the narrator walks you through the process of making a yellow ball by crocheting in spiral rounds. The camera gives a nice close up of the stitcher's hands and the narration tells you what she’s doing at every step. Finish this tutorial and you’ll have a ball that you can use as the head or body of your first amigurumi.

* The Invisible Decrease - Used in amigurumi, this kind of decrease limits the size of the gaping holes that often occur when making decrease stitches.


This penguin is made using fuzzy yarn. Pattern available from Planetjune.com

* Fuzzy Yarn Tips - How to work with fun fur and other fluffy yarns. Ideal for furry amigurumi making, but if you’re planning to use a fluffy yarn for any kind of crochet project these tips are worth reading.

* Making Hair - Two different techniques for making hair for amigurumi and other crochet dolls. One courtesy of Geek Central Station and the other from Owlishly. Test them out, you may find you’re more comfortable with one method than the other or that one is better suited to the kind of hair you want your creations to have.


The hair made on Fellowhip member Sam was created using the technique described at Geek Central Station.

This hair was created using the method described at Owlishly.

* Plastic Bag Yarn - The latest trend is creating crochet market bags to replace the less environmentally friendly plastic bags you get at the grocery store. Why not take the process one step further and turn those plastic bags into the yarn you use to make your reusable market bag?

* Pattern Charts from Video Game Sprites - Sprite Stitch explains how to convert classic 16-bit video game sprites like Mario into charted patterns that can be used with cross stitching, crochet, knitting or Perler Beads. Even if video game characters aren’t your thing there’s some good advice here. Also check out KnitPro, a free site where you can convert jpegs into gridded charts.

* Realistic Fur - How to use a pet’s slicker brush to comb out mohair and other fuzzy yarns to make realistic looking animal fur.


Wibit made this Highland Cow using the technique she describes for making realistic fur with a slicker brush.

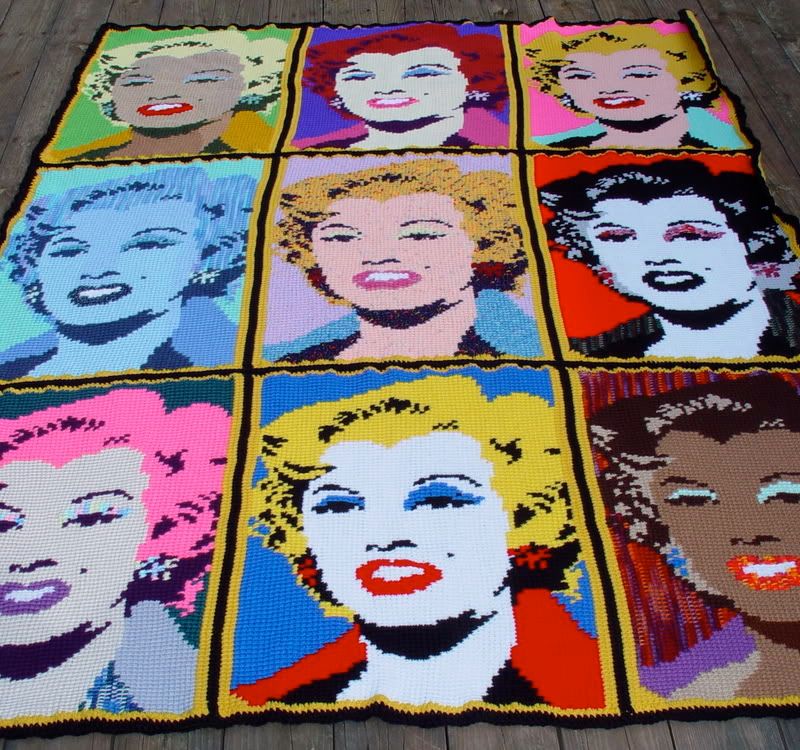
* Changing Colours in Tunisian Intarsia - Once you know how to change colours you can turn any charted picture into an afghan made in the Tunisian style.


Once you can change colours in Tunisian crochet you can make elborate picture afghans like this Marilyn Monroe Warhol Style afghan made by Pesky Pixie

* Crochet on the Double Tutorial - Similar to Tunisian crochet, this technique allows you to make coloured stripes in an afghan working with a double-ended crochet hook. A beautiful way to make baby blankets.


This sample of Crochet on the Double and the tutorial were created by Craftster member fantasticmio.

Sunday, May 18, 2008

Flying Homer and the Three-Eyed Fish

With The Simpsons celebrating its 19th (!) season finale tonight I thought I should give a little love to Matt Groening's other masterpiece for a change. I have to admit I'm not that well versed in the Simpsons. I've seen it, I like it, I saw the movie in theatres, but I'm probably the last person you'd want to pick for your Simpsons trivia team. In my world it's always been the lesser cousin of Futurama. Even so, occassionally when I'm tired I'll watch an episode because I know it will make me laugh at least once, which is all I'm really looking for.

I have to admit I was a little surprised that my Google and Etsy searching didn't turn out any crocheted sets of the Simpson family. I may have to tackle a crocheted Maggie someday since she's always been my favourite. In the meantime, we have these two crochet projects that I really like.

Flying Homer is pretty cute and I think Craftster member Chubby Pixie did a great job of replicating the Groening mouth, which is always hard to mimic in crochet. However, I love the story behind this Homer as much as the actual doll. Chubby Pixie made him specifically to serve as the pilot in her husband's remote control plane:


Craftster member knifinaround came up with this great rendition of Blinky, the three-eyed fish from the Simpsons. She didn't write down the pattern for him, but if you visit the original discussion on Craftster she has given a general description of how she put him together. Very cute!

Wednesday, May 14, 2008

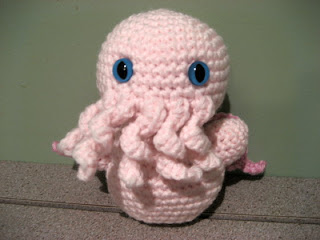
Tiny Cthulhu! Free Pattern

Here is the pattern for the Tiny Cthulhu that I sent off to Australia. As always, if you have any questions about the pattern or notice any problems with it please contact me through the comments section. I love to see pictures of the things people make with my patterns so if you make a Tiny Cthulhu and post it online, send me a link.

*New: Are you looking for the Baby Cthulhu with legs? Read here.

Tiny Cthulhu Pattern

Note: To make the Cthulhu with a shirt on switch to your shirt colour on RND 17 of the body and then back your main colour at RND 26. For the arms switch to your shirt colour at RND 3 on each arm. If you want a bare Cthulhu just make the whole thing in one colour.

I highly recommend using the Invisible Decrease method when you get to the decrease rounds of the pattern.


Materials

1 skein of worsted weight yarn (the colour is your choice, but Cthulhus are traditionally green). You’ll need about 1/2 or less of a second colour for the shirt if you want a shirt.
two 12mm safety eyes (for Cthulhus I really like the cat’s eyes)
fiber fill or stuffing of your choice
size F (3.75mm) crochet hook

Special Stitches

In the pattern I’m going to call the Cthulhu’s tentacles a coil. When you see coil, do this:

coil: chain 9, 3 sc in third chain space from hook, 3 sc in each of next six spaces.

If you find the chain spaces too small to work 3 single crochets in, try making the chain with a hook that’s one size larger.

Head and Body (worked as one piece, starting with head)

6 sc in a magic ring
RND 1: work 2 sc in each st around. (12 stitches)
RND 2: *sc in first st, 2 sc in next st*, repeat around (18 stitches)
RND 3: *sc in first 2 st, 2 sc in next st*, repeat around (24 stitches)
RND 4: *sc in first 3 st, 2 sc in next st*, repeat around (30 stitches)
RND 5: *sc in first 4 st, 2 sc in next st*, repeat around (36 stitches)
RND 6: *sc in first 5 st, 2 sc in next st*, repeat around (42 stitches)
For RNDs 7-9 sc into each st around (42 stitches)
RND 10: (tentacle round!) sc in first 17 st, *coil, sc in next 2 st* repeat 5 times (so you have five tentacles), sc in each st to end of round. (42 stitches)
RND 11: sc in each st around (42 stitches) Note: If you have less than 42 that’s okay because we’re about to start decreasing, if you have more than 42 go back and try to fix the problem.
RND 12: *sc in first 5 st, dec in next st,* repeat around (36 stitches)
RND 13: *sc in first 4 st, dec in next st,* repeat around (30 stitches)
RND 14: *sc in first 3 st, dec in next st,* repeat around (24 stitches)
place safety eyes, using photos as a guide.
RND 15: *sc in first 2 st, dec in next st,* repeat around (18 stitches)
RND 16: *sc in first st, dec in next st* repeat around (12 stitches)
If you’re Cthulhu is going to have a shirt, switch to shirt colour for the next round.
RND: 17: *sc in first st, 2 sc in next st*, repeat around (18 stitches)
RND 18: *sc in first 2 st, 2 sc in next st*, repeat around (24 stitches)
RND 19: *sc in first 3 st, 2 sc in next st*, repeat around (30 stitches)
RND 20: *sc in first 4 st, 2 sc in next st*, repeat around (36 stitches)
RND 21: *sc in first 5 st, 2 sc in next st*, repeat around (42 stitches)
For RNDs 22-25 sc into each st around (42 stitches)
end shirt by switching back to main colour for next round
RND 26: *sc in first 5 st, dec in next st,* repeat around (36 stitches)
Stuff head section to desired firmness now.
RND 27: *sc in first 4 st, dec in next st,* repeat around (30 stitches)
RND 28: *sc in first 3 st, dec in next st,* repeat around (24 stitches)
RND 29: in back loop only *sc in first 2 st, dec in next st,* repeat around (18 stitches)
RND 30: *sc in first st, dec in next st,* repeat around. (12 stitches)
Stuff body to desired firmness.
RND 31: dec in each st around. (6 stitches)
Finish off, weave end through last six stitches and pull closed, fasten off and hide end inside body.

Arms (make 2)

4 sc in magic ring
RND 1: work 2 sc in each st around (8 stitches)
RND 2: *sc in first st, 2 sc in next st*, repeat around (12 stitches)
switch to shirt colour for next round, if making a shirt.
RNDs 3-5: sc in each st around (12 stitches)
sl st into next stitch, finish off leaving long tail for sewing.

Wings (make two)

Some people have found the instructions for the wings a bit confusing, so I've made a visual tutorial explaining how they're made.

Ch 4. Turn and do 1 sc in each of next 3 ch sps. Ch 1, turn. 3 sc, ch 4. turn. 3 sc on chain, 3 hdc on the three sc. Ch1, turn. 3 sc, ch 5, 4 sc in chain, 3 hdc. Ch1, turn. 4 sc, ch 6, 5 sc in chain, 4 hdc. Ch 3 *Work appox. 8 dc along the top edge of the wing (opposite the pointy bits). Sl St into first Ch, or near first Ch. Fasten off.


Assembly

Stuff arms and attach to body. Attach wings to centre of back. Hide loose ends inside body.

Enjoy!

Tuesday, May 13, 2008

Futurama's Zoidberg, Nearly Life-Size

I stumbled across this quite by accident and couldn't help being impressed by the size and detail. That's a crocheted Zoidberg that you're looking at there and I'm guessing it must be over three feet tall. It was made be Jennifer from Moose Jaw, Saskatchewan. I tried to contact her via e-mail to compliment her on what must have been a pretty time consuming project. Unfortunately I didn't receive any response back. Not really surprising since it looks like she made this guy around 2004 to 2005. At least that's when conversation about it dried up on this Planet Express Employee Lounge thread. Jennifer also made her own crocheted Nibbler, long before my own, and was working on her own Bender. You can view her awesome work in the crochet section of Jenutech Designs.

Sunday, May 11, 2008

Mother's Day Amigurumis

Now that Mother's Day has passed I can show off the tiny amigurumis that I made for the occasion. All of these come from Ana Paula Rimoli's Amigurumi World: Seriously Cute Crochet . I wanted something quick and homemade that I could give to each of the important moms in my life and Rimoli had a wonderful selection of patterns to choose from.

I think the hedgehog took the longest to make because you have to go back and put his coat on after you've stitched the main body. I'm guessing he was about a 5-6 hour project, while the other two came in at only about 3 hours apiece. I bought the Patons Decor in Rich Taupe especially for the owl, but aside from that I managed to use up bits and pieces of colours I already had.


First up is the owl which I made for my Grandma. She collects owls so he was the obvious animal choice for her. I'm really happy with how he turned out. I think I actually like him better than the sample owl that was in Rimoli's book. His beak is a bit of leftover Vanna's Choice in Mustard and the rest of him was made using Patons Decor in Rich Taupe, Taupe, and Aran.


This cat was made for my Mom who loves cats. Does it look like a cat? I'm a little worried he looks more like a bear than a cat. In his defence he does have cat's eyes and a long tail. More of the Rich Taupe here. I originally tried to make him in grey, but my grey wool was too thick for the small hook you need to use on these Tiny Amis. Trying to make him in grey was very uncomfortable so I switched to brown.


The hedgehog was made for my boyfriend's Mom. I let him choose from several different animals and he went with the hedgehog. The whole time I was making it I was worried it was going to be a disaster and to be honest it really didn't look good until the end when I had all the pieces sewn on. Now I'm becoming more enchanted with it every time I look at it.

Rimoli's pattern uses worsted weight for the coat as well as the animal's body, but I switched this for some fun fur that I had on hand and I quite like the effect. The fun fur was a generic brand that's sold by Dollarama and since I was using a larger hook for this pattern I could use my grey. It's a Bernat Super Saver colour. I should also note, the pattern seems to indicate that you stitch on the coat after the hedgehog is stuffed. I chose to make it before stuffing because I was afraid that if I did it after, my hook would catch on the stuffing and accidently pull some of it out.


My Ami bunny snuck into this final picture. I couldn't resist including this butt shot because I wanted to show off what I've been doing with the backs of these critters. I picked up these little heart shaped brads at Dollarama back at Valentine's. One box of plain hearts (like the bunny has) and one with words on them. Both the owl and cat have the word "love" on their hearts. The fun fur made it too difficult to put one on the back of the hedgehog. I thought of putting one on his chest, but he's so small, I just felt like it made his front side too busy. Nonetheless, he too was made with love.

If anyone is interested I've started an Amigurumi World Crochet Along on Craftster. You can post pictures of projects you complete from the book there and discuss the patterns with fellow crocheters.

Friday, May 9, 2008

Alley Cats! Cute Thing of the Week


If you're a fan of Craft: then you may have already seen these adorable alley cats over there. I love cats and it's not often that you see a realistic looking crocheted cat. In most cases there's something about the ears or the paws that just isn't quite right. So, when I saw these cats that actually look like cats I had to go the extra mile and see if I could find the pattern.

Happily, after getting the Google Translater to convert two different French blogs into English and about 20 minutes of reading I was able to discover that the pattern comes from Etsy seller Stripeyblue. As she describes it in her shop:

This is "Alley Cats," a PDF pattern for you to make 3 poor but happy little cats looking for food at their "diner." Also included is the pattern for their favorite - fish bone. There is also a pattern to crochet a garbage can.

Not a bad deal for only $4.50! I also have to throw in an honourable mention for the blog Amigurumi Made in France. Many of their members are using this Alley Cat pattern as part of a Crochet Along. You can see the different variations and colours of their cats and fish bones here.

Wednesday, May 7, 2008

Can't Stop the Serenity!

"There are two ways to fight a battle like ours. One is to whisper in the ear of the masses, try subtlely and gradually to change the gender expectations and mythic structures of our culture. That's me. The other is to step up and confront the thousands of atrocities that are taking place around the world on an immediate, one-by-one basis. That's a great deal harder, and that's Equality Now. It's not about politics; it's about basic human decency." -- Joss Whedon

I'm taking a detour from the usual crochet and crafty talk to tell you a little about a charity event that's very important to me. Each June, on or near Joss Whedon's birthday, thousands of fans gather in movie theaters around the world to watch a little movie Joss made called Serenity. Proceeds from the day's screening go to Equality Now, Joss Whedon's charity of choice. In 2006, Can't Stop the Serenity raised over $65,000 for Equality Now. In 2007, that number went up to $114,000. This year the goal is to raise $155,000 and host events in 55 cities globally.

If you're a fan of the projects that I feature on this site then I'm guessing that you're probably also a fan of something Joss has done whether it's Buffy the Vampire Slayer, Angel, Firefly or his recent work in the comics Astonishing X-Men or Runaways. Attending a Can't Stop the Serenity screening is a way to give a little something back for all the wonderful things Joss has given us. Plus, you get to see Serenity on the big screen again. How cool is that?

I will be attending the screening that's taking place on June 22 in Vancouver. To keep up with the planning and order tickets for that screening visit the Vancouver Charity Screening of "Serenity" blog. To find out where else in the 'verse screenings are taking place in 2008 or how you can help host an event in your area, visit Can't Stop the Serenity.

Need a little more incentive to get out of the house and meet fellow Joss fans? Take a few minutes to check out Equality Now and the amazing work they do throughout the world or go to YouTube and watch Joss Whedon's Equality Now Speech. It's only 8 minutes and I guarantee it will make you laugh at least once. It may also inspire you to act. Attend a screening. Make a donation to Equality Now. Tell others about the event.


Want the Pattern?

Finally, I'd hate to send anyone off to a screening underdressed. You can make your own knit Jayne Hat using this free pattern available on Craftster that was created by Emisanboo or this one that's available through the Vancouver/Firefly Serenity Meetup Group.

See, it always comes back to crafty stuff in the end!

Monday, May 5, 2008

We've Got Movie Sign!


Just thought I'd let you all have a look at these coasters we made as a birthday gift for someone. It was part of a theme, as the gift also included a DVD boxed set of Mystery Science Theater 3000. The coasters are made from Perler Beads and I used the knitted MST3K chart that I had previously featured in this Cute Thing of the Week.


I bought a bag of 1,000 black perler beads from KoolStuff4Kids a few weeks ago and thought that the bag would last forever. Not so much. I used at least 3/4 of it making these things. It was worth it though. I really like the way they turned out and now I'm brainstorming other coaster sets I could make where the coasters look good individually, but set together they form a larger picture. We're also thinking of making a second set of these MST3K coasters, only using glow-in-the-dark beads for the background colours.

Friday, May 2, 2008

Star Wars Stitch Markers! Cute Thing of the Week


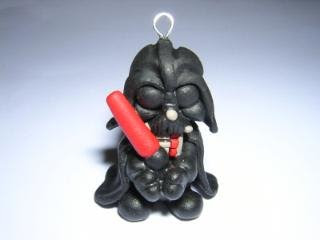
Craftster user kishcrafts designed these amazing Star Wars Stitch markers. Made of Polymer Clay, they stand just over one inch tall. The whole set is wonderful and I am completely blown away by the level of detail work on Vader. He and Yoda are definately my favourites.


I think a set of these could inspire even the most procrastinating knitter to embark on a larger project, just for the fun of using these markers. To view more pictures or pay your compliments to kishcrafts, check out her original post on Craftster. From there click on her name to view her profile and some of her other incredible polymer clay creations.


Sadly, when it comes to working with clay, I've never advanced beyond making snails and little round balls.