Wednesday, May 19, 2010

Glowing Kodama Tree Spirits, with Free Pattern

The kodamas are my favourite part of Hayao Miyazaki's Princess Mononoke. The way they bob their heads and make that tranquil rattling sound is adorable. Ami Amour created the pattern and crocheted these terrific kodamas. The one on the right was made using Nightlights glow in the dark yarn, which I think is a great use for this yarn since the kodamas are kind of glowy in the movie.

Want the pattern?

The kodama pattern is available free on the Ami Amour blog. I'm also so enchanted with the amazing free patterns available there that I'm adding Ami Amour to my blog list. Check my left sidebar to see when there are updates there.

Thursday, May 13, 2010

Granny Square Elephants

This seems like the perfect follow-up to my last post. This baby elephant design was created by Irina and was inspired by a granny square quilt. There may be others out there, but this is the first time I've seen granny squares incorporated with amigurumi and it's a very clever effect.

The pattern, entitled Noodle the Elephant, is available for $4.00 US through Reeneegurumi's pattern shop. There are also some adorable giraffes in there that may be hard to resist. Click on over and have a look.

Tuesday, May 11, 2010

Marble Granny Afghan

Would you believe this is my first granny square? I guess this is what they call jumping in with both feet. Thankfully the granny square is one of the easiest and most forgiving patterns around. I almost always crochet while watching TV and numerous times I forgot to make the chain 1 between the sets of double crochet. Aside from a little bit of puffiness in the middle, which won't show when someone is actually using the afghan, my mistakes are mostly hidden.

I'm absolutely adore this yarn, which is James C Brett - Marble Chunky in Autumn. I used three balls worth and a J hook to put this together. It's an acrylic yarn, but incredibly soft. I've been reassured that it becomes even softer each time you wash it.

I actually worked two balls of this into a shawl before finally admitting to myself that I would never wear said shawl. (I'm just not a shawl person.) With much help from the boyfriend, who is both wise and witty, I frogged that project and decided to make this instead. Simple, soft and cozy.

The James C Brett - Marble comes in lots of beautiful shades and is also available in a sport weight. I just picked up some in that size for a new afghan project. I've never spotted this stuff in a big chain craft store, but the Kertzer website's store locator has a pretty extensive list of local yarn stores where it can be found in Canada and the United States.

A non-flash, natural light close-up of the afghan so that you can see my stitching. I think the flash pictures are more true to the actual colouring of the blanket though.

Wednesday, May 5, 2010

Book Talk

I wanted to draw readers attention toward a couple of interesting fibre craft books that I've come across lately.

Encyclopedia of Tunisian Crochet by Angela "Arnie" Grabowski. I received this as a birthday gift from one of my crafty friends. Author Angela Grabowski has clearly spent countless hours researching and tracking down information about the art of Tunisian crochet. As she puts it:

"Tunisian crochet is one of the most misunderstood [or perhaps forgotten is a better word] forms of crochet in the United States and possibly the world. It was a popular form of crochet during the Victorian Era yet it seems to have been lost during the early 20th century" p. 7.

Grabowski's book provides readers with background information on the craft and clarifies confusion over the various stitch names that have been used in Tunisian crochet over time and throughout the world. If that weren't enough, it also provides stitchers with tutorials for over 400 stitches and numerous patterns that can be created using the Tunisian techniques.

I personally haven't had a chance to make anything from the book yet, but have spent a great deal of time browsing through it and reading bits here and there. Grabowski's instructions are clearly written and there are plenty of pictures and diagrams at every step. This is definitely a great asset for anyone, like myself, who is interested in learning more about Tunisian crochet.

The Mummies of Urumchi by Elizabeth Wayland Barber. The boyfriend, who is far more of a history buff than me, ran across this one at the local library. A researcher of prehistoric textiles, author Elizabeth Wayland Barber discusses 4,000 year old mummies found in what is today known as Chinese Turkistan. What makes these mummies particularly interesting is "their clothes - woolens that rarely survive more than a few centuries - have been preserved as brightly hued as the day they were woven."

What we have here is possibly the ancestors of modern day cross stitch and embroidery. The book contains beautiful colour photos and even some diagrams of how the garments were woven and decorated with coloured stitches. This book is fascinating for anyone who is up for a bit of paleocrafting or consideration of the history behind the fibre crafts we make today.


Sunday, May 2, 2010

Cuddly Cthulhu with Free Pattern!

Welcome one and all to the 200th post at Cthulhu Crochet and Cousins. Thank you everyone for being here, especially those of you who are long time readers of the blog, and especially those of you who have taken the time to post comments or share pictures of things you've made with my patterns.

I've always told myself that I'd keep the blog going as long as it was still fun (and didn't start to feel like work) Now, here we are at 200 posts, 330,486 visitors (the current count while I'm typing this) and it's still fun!

I wanted to go back to the beginning and do something special for this landmark post, so I decided it was time to revisit cthulhu patterns. Don't get me wrong, I love my previous incarnations of cthulhu, but I've always wanted to try for one with a more pear shaped head. Something a bit more accurate to illustrations I've seen such as this one. I also wanted the new design to be a bit bigger so that you could pick cthulhu up and give him a hug, hence the name Cuddly Cthulhu! I'm really happy with the way this one turned out and I hope that you all will enjoy him too.

As always, feel free to post a comment or send us an email if you have any questions about the pattern, or if you want to share pictures of your own Cuddly Cthulhu. Thanks again to everyone for stopping by.


Cuddly Cthulhu Pattern

Materials

Size F (3.75mm) crochet hook
1 skein worsted weight yarn.You may wish to use a contrasting colour or darker shade for the wings. (Sample was made using Vanna’s Choice Kelly Green for the body and Vanna’s Choice Olive for the wings.)
Quilt batting (or your preferred stuffing material)
Two 15mm safety eyes

(2010/10/22 - Note: I was remaking the Cuddly Cthulhu a few days ago and realized that the head instructions were less than accurate. Some lines were missing causing the head to come out much stubbier than I had intended. Following the directions in the pattern will now result in a cthulhu head that looks much more like the one in the sample pictures I've posted here.

The head directions have now been changed from Rnd 8 onwards to the end of the head. Sorry for any inconvenience this edit causes. If you prefer the cthulhu with a stubbier head, work the head directions below omitting rounds 8,9,10,11, and 18.)

Head
6 sc in magic ring
RND 1: work 2 sc in each st around. (12 stitches)
RND 2: *sc in first st, 2 sc in next st*, repeat around (18 stitches)
RND 3: *sc in first 2 st, 2 sc in next st*, repeat around (24 stitches)
RND 4: *sc in first 3 st, 2 sc in next st*, repeat around (30 stitches)
RND 5: *sc in first 4 st, 2 sc in next st*, repeat around (36 stitches)
RND 6: *sc in first 5 st, 2 sc in next st*, repeat around (42 stitches)
RND 7: *sc in first 6 st, 2 sc in next st*, repeat around (48 stitches)
RND 8-11: sc in each st around. (48 stitches)
RND 12: *sc in first 2 st, dec over next 2*, repeat around (36 stitches)
RND 13: sc in each st around (36 stitches)
RND 14: *sc in first st, dec over next 2*, repeat around (24 stitches)
RND 15-18): sc in each st around. (24 stitches)
RND 19: 1 sc in first 6 stitches, *1 sc in front loop only of next st, ch 16, skip first st on ch, 15 sc in chain* repeat 11 more times, (making 12 tentacles in total), 1 sc in each of next 6 st (24 stitches)
RND 20: *sc in first 2 st, dec over next 2 st*, repeat around (18 stitches)
Place safety eyes, using photos as a guide. Stuff body firmly.
RND 21: *sc in first st, dec over next 2 st*, repeat around (12 stitches)
RND 22: *dec over next 2 st*, repeat around (6 stitches)
Add more stuffing if needed. Sl st in first st, finish off.


Body
6 sc in magic ring
RND 1: work 2 sc in each st around. (12 stitches)
RND 2: *sc in first st, 2 sc in next st*, repeat around (18 stitches)
RND 3: *sc in first 2 st, 2 sc in next st*, repeat around (24 stitches)
RND 4: *sc in first 3 st, 2 sc in next st*, repeat around (30 stitches)
RND 5-16: sc in each st around (30 stitches)
RND 17: *sc in first 3 st, dec over next 2 st*, repeat around (24 stitches)
RND 18: sc in each st around (24 stitches)
RND 19: *sc in first 2 st, dec over next 2 st*, repeat around (18 stitches)
RND 20: sc in each st around (18 stitches)
RND 21: 1 hdc in each of first 9 stitches, sl st into next stitch. Leave rest of row unstitched. Finish off, leaving a long tail for sewing. Do not pull closed. Stuff body firmly.

Arms (make 2)
6 sc in magic ring
RND 1: work 2 sc in each st around. (12 stitches)
RND 2: *sc in first 2 st, 2 sc in next st*, repeat around (16 stitches)
RND 3-4: sc in each st around (16 stitches)
RND 5: *sc in first 2 st, dec over next 2 st*, repeat around (12 stitches)
RND 6-9: sc in each st around (12 stitches)
Stuff firmly.
RND 10: *sc in first st, dec over next 2 st)*, repeat around (8 stitches)
RND 11-13: sc in each st around (8 stitches)
Add more stuffing if needed. Sl st into first st, finish off, leaving long tail for sewing.

Legs (make 2)
6 sc in magic ring
RND 1: work 2 sc in each st around. (12 stitches)
RND 2: *sc in first st, 2 sc in next st*, repeat around (18 stitches)
RND 3-5: sc in each st around (18 stitches)
RND 6: 1 hdc in each of first 9 stitches, 1 sc in each of next 9 stitches (18 stitches)
RND 7: *sc in first st, dec over next 2 st*, repeat around (12 stitches)
RND 8: *sc in first 4 st, dec over next 2 st*, repeat around (10 stitches)
Stuff firmly.
RND 9-14: sc in each st around (10 stitches)
RND 15: 1 hdc in each of first 6 st, 1 sc in each of next 4 st (10 stitches)
Add more stuffing if needed. Sl St into first st, finish off, leaving long tail for sewing.

Wings (make 2)

Note: These are made the same way as the wings on my Tiny Cthulhu, only they come out bigger. If you get a little stuck, you may want to refer to this tutorial for the wings from the Tiny Cthulhu.

Ch 7. Turn and do 1 sc in each of next 6 ch sps. Ch 1, turn. 6 sc, ch 6. turn. skip first ch, 3 sc on chain, hdc to end of row. Ch1, turn. 6 sc, ch 7, skip first ch, 4 sc in chain, hdc to end of row. Ch1, turn. 7 sc, ch 7, skip first ch, 4 sc in chain, hdc to end of row. Ch1, turn. 8 sc, ch 7, skip first ch, 4 sc in chain, hdc to end of row.Ch1, turn. 9 sc, ch 7, skip first ch, 2 sc in chain, hdc to end of row. Ch 3 *Work appox. 8 dc along the top edge of the wing (opposite the pointy bits). Sl St into first Ch, or near first Ch. Fasten off, leave long tail for sewing.

Assembly
Using photos as a guide, sew body to head. Add more stuffing as you’re sewing together, if necessary. Sew legs, arms and wings to body.

In case you're curious, the little heart on his butt says 'love'. Let's all say "aww" now!

Enjoy! Don't forget to check out my other patterns, available under the My Free Patterns tab in the left sidebar.


Saturday, May 1, 2010

Faunasphere Moment

Apologies to my regular readers for the off-topic nature of this post. Tomorrow I'll be back with my 200th post and a new free crochet pattern to share with everyone, so please stop by for that.

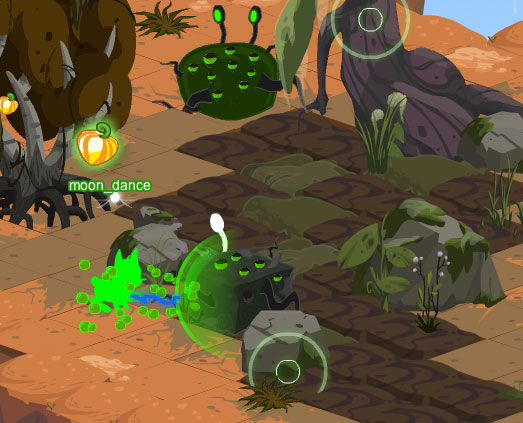
If there's anyone else out there who plays Faunasphere, they'll recognize the significance of these pictures.

I was taking these on my computer while my friend moon_dance's fauna leveled up to twenty and received her gold collar. That's currently the final level you can reach in the game and a major milestone that takes many hours of dedication. I wanted to post the pictures somewhere where moon_dance could see them. Since my computer refuses to talk to flickr, for reasons I've never figured out, this is the best place where I can share the pics.

Anyone else out there playing Faunasphere? Someday I need to try making amigurumis that look like my in-game characters. I haven't had a chance to work on that yet. Much like Critter Crunch, I really love the artwork of this game. It's a beautiful world to roam around in.

Moon-dance, you should be able to click on the pictures, then they'll open larger in another window and you can save them to your hardrive.

Just as we were doing the final round of zapping for the gold collar (at 2:00 a.m.!) this ridiculous rude flapper showed up and refused to step aside so that moon_dance could make the final zap solo. I've edited out the flapper's name, mostly just so that I could mention how ridiculous and rude it was.


Once you become a level 20, you have a gold collar around your neck and the lazer that zaps out of that collar is randomly changed to a new colour. Moon_dance got the blue zap, which I think looks quite nice. The characters we're playing are called nibblers. Not at all like the nibblers from Futurama. Oddly enough there's another critter in the game called a thumper, that does remind me of the nibblers from Futurama.

Thanks moon_dance, it was fun. Well worth staying up an hour longer to play photographer.


Last, but not least, a shot of my level 20 tusker Ivory, zapping some pollution in her gold collar with her pink/purple laser. And of course, you've all now seen my Faunasphere screen name. If you're a member feel free to send me an in-game friend request. Unless of course you're the kind of player who just asks for eggs and bux all the time. Then you won't find yourself on my friend list for very long.

To the rest of my readers, thanks for indulging the digression. I hope you at least enjoyed the artwork. Don't forget, 200th post and a free pattern tomorrow!

Tuesday, April 20, 2010

Can't Stop the Serenity Donations, and a free pattern!

If you're attending this year's Can't Stop the Serenity events in Edmonton or Toronto you'll have a chance to win one my Firefly cross stitches. I stitched up this first piece with three of our favourite heroes as a donation for the Serenity Charity Screening in Edmonton. Click the link to learn more about that event, which is taking place Sunday, June 27. The second piece with Jayne attired in his cunning hat I've made as a donation for the Toronto screening, taking place Saturday June 26.

Of course this is in addition to the 4 pieces that will be available in the silent auction or as prizes at our own Can't Stop the Serenity event in Vancouver on June 26. These include individual cross stitches of Jayne, Wash and River as well as the big group shot of the entire cast in stitchy goodness.

After the events are over I'll do another post letting everyone know how much was money was raised for Equality Now with these pieces. I'm excited to find out myself.

And now folks, my fingers are tired. Of course, if anyone else would like a Firefly cross stitch or two for their Can't Stop the Serenity event I remind you that all the character patterns are available in the left sidebar under the My Free Patterns heading. Please feel free to make use of them. I'm confident that most Browncoat groups have a cross stitcher or two in their midst.

I'll even get you started with this free pattern for a bookmark that would likely only take a couple hours to stitch up. Note: Mal should be cross stitched, I just did the outline here so you could see where he's positioned. Refer to his pattern for full cross stitch details.

Enjoy, and as always, post a comment if you have any questions about the pattern.