Showing posts with label tutorial. Show all posts

Monday, August 22, 2011

Hoping to Prevent a few Skein Headaches...

I spent the better part of a week trying to unknot this 800 yard skein of yarn and convert it into a useable ball, with the assistance of the boyfriend. (Who was not only wise and witty, but also very patient!)

I tend to have bad luck with skeins and in this case the second I cut the two ends free and gave one a tug it seemed I had a gigantic clump of knots. I think the only thing that prevented me from tearing my hair out was the fact that the yarn in question was partially rayon and quite slippery. Rather then ending up with tight knots, the yarn was slippery and easy to untangle, but incredibly time consuming.

Not wanting to go through the same headaches with other skeins I have waiting to be unravelled, I thought I'd turn to the internet for some advice. After all, I'm sure I'm not the only one that is skein challenged out there.

Out of my searching comes this video, courtesy of Twenty Pound Tabby, that demonstrates how to untwist a skein of yarn:


Followed by a Part 2, which shows how to wind a skein into a ball:


I think there's some great advice in these videos, plus I'm totally digging the instructor's Animal t-shirt!

My purpose for sharing this is twofold. First, I'm hoping it will help some other knitters and crocheters who are plagued by tangled skeins. Second, I was hoping we could get a discussion going in the comments section for further tips, advice or questions about unravelling skeins. Have you seen any other great advice related to this elsewhere on the web? If so, feel free to share a link or tell us about your own skein unravelling experiences.

I don't buy skeins too often so I don't want to invest a lot of money in gadgets like the ball winder or an umbrella swift. We don't even have any four post legged chairs, like the one in the video, in our house. I'm looking at the knobs on our bi-fold closet though and wondering if I could use them in place of the chair legs? Any other ideas for common household items that could make the skein unravelling/ball winding process easier? I'd love to hear your ideas!

Wednesday, June 1, 2011

The Loom will be With You Always - Star Wars Travel Embroidery Case

I completely adore this amazing project that Geeky Sweetheart has designed. It's a travelling case for your cross stitch and embroidery looms! You see a lot of travel cases and bags for crochet and knitting supplies, but I haven't see too many for embroidery. (Maybe I just haven't been looking?) I have to admit I am usually reluctant to take my cross stitch projects on the road because I'm worried that the pale fabrics I'm stitching on will get dirty, or it's just too many skeins of floss to be carrying around. However this is pretty cool, and would be great for smaller projects, like my Firefly characters.

In case you can't read the text at this size, Leia is proclaiming, "I love embroidery." Han, accepting the numerous trips to the galaxy's finest needlework stores he'll have to make in the Falcon, reluctantly replies, "I know."


Above you can see what the case looks like open. On the right it's holding a loom with a pretty awesome death star stitching, and on the left side I believe there's a pocket to hold floss skeins and needles. Geeky Sweetheart initially made this for a Star Wars swap, but liked it so much that she created a second one for herself, and was kind enough to post a full tutorial, including video, so that you too can create your own Star Wars embroidery case.

Have fun!

Tuesday, September 15, 2009

Wing Tutorial for Tiny Cthulhu

I've received a few comments from people who have trouble figuring out the wing instructions in the Tiny Cthulhu pattern. Since I'm making another one of these myself right now I figured I could photograph the process as I went.

Here again are the full instructions for the Tiny Cthulhu wing piece. Along with each photo, I've reprinted the instruction describing what is done in that picture. For those that are curious, I'm making my wing with a size F (3.75mm) crochet hook and the yarn is Loops & Threads Impeccable Worsted Weight in Luxury Ombre.

Wings (make two)

Ch 4. Turn and do 1 sc in each of next 3 ch sps. Ch 1, turn. 3 sc, ch 4. turn. 3 sc on chain, 3 hdc on the three sc. Ch1, turn. 3 sc, ch 5, 4 sc in chain, 3 hdc. Ch1, turn. 4 sc, ch 6, 5 sc in chain, 4 hdc. Ch 3 *Work appox. 8 dc along the top edge of the wing (opposite the pointy bits). Sl St into first Ch, or near first Ch. Fasten off.

Pic 1: Ch 4. Turn and do 1 sc in each of next 3 ch sps (skip chain closest to hook).

Pic 2: Ch 1, turn. 3 sc, ch 4. turn

Pic 3: 3 sc on chain (skip chain closest to hook), 3 hdc on the three sc. Ch1, turn.

Pic 4: 3 sc, ch 5, (skip chain closest to the hook) 4 sc in chain, 3 hdc. Ch1, turn.

Pic 5: 4 sc, ch 6, 5 sc in chain (skip chain closest to hook), 4 hdc. Ch 3

Pic 6: *Work appox. 8 dc along the top edge of the wing (opposite the pointy bits). At this point, I've only crocheted the first four double crochet stitches so you can see where they should go.

Pic 7: Sl St into first Ch, or near first Ch. Fasten off.

Now just make a second wing following these instructions and attach them both to the back of your cthulhu.

Hope this helps clear things up a bit. Post a comment if you have any more questions.

Wednesday, August 6, 2008

Ninja Cozy Tutorial!

I just made this ninja cozy for my iPod and thought I'd share my quick and easy instructions for cozy making. Not really a pattern, just a description of how I go about doing this. It's a suitable method for iPod cozies, cell phone cozies, or any other small electronic device that you want to keep safe from scratches.

Choose some yarn that you like and a hook size that's comfortable for working with the yarn you've chosen. You won't need much, probably less than 50 grams. Aside from that you may want some notions like googly eyes, felt, sequins, flat-backed rhinestones or other costume jewels. You'll also need one button, any size or shape, to hold the cozy shut and a small amount of thread to sew the button on.

To Begin

Start by making a chain that is long enough to go around the widest part of your iPod so that the first and last chains just touch each other when you wrap it around. I'm working with an iPod nano here and the chain I made (with an H Hook) was 20 ch long. When your chain is long enough slip stitch into the first chain you made, now chain 2.

The Body

The body of the cozy is worked in half-double crochet stitches and it is done in rounds. Start by making a hdc stitch into each chain space around, then sl st into the top of the ch 2 that you made in the last step to close the round. Begin each new round with a chain 2. It's important to work in rounds rather than spirals otherwise the closing flap will come out crooked at the end.

Continue with hdc stitches around and a sl st to close each round until the cozy is long enough to cover the entire length of your iPod. For me this took 9 rounds. Once it is long enough, make only a ch1 after your sl st.

The Flap

How many stitches do you have in your round? Half of your stitches will be used to make the flap. For my nano cozy I had twenty stitches so I'm going to use that number as an example. Adjust these instructions accordingly, depending how many stitches you have.

Single Crochet into the first 10 stitches, then hdc in the last 10 stitches. Do not sl stitch to close the round. Instead chain 2, turn and hdc back across the 10 hdc stitches you made in the last round. You'll now work in rows, making a turning chain of 2 at the end of each row.

You want to work this flap piece until it covers about one third of your cozy when folded over. Then it will be time to make the button hole.

The Button Hole

Button holes will stretch a bit over time, so don't be afraid to make the hole kind of tight. To make the button hole you'll need to make a couple of chains in the middle of your next row. My button hole row was done like this.

sc 4, ch 2, sc 4.

The number of chains you need will depend on how wide you need to make the button hole. At the end of this row make your ch 2 turning chain as usual and then do another row of hdc across, stitching into the chains in the middle of the last row when necessary. See how that makes an nice hole in the middle?

To finish off the flap, I like to ch 1, turn and do a final row of single crochet across. Then finish off and weave in the end of the yarn.

Finishing up

Use matching thread or yarn to whip stitch the bottom of your cozy shut. If you're making the cozy for an iPod or other music player you may want to leave a hole approx. 1/4 of an inch wide on the side where the headphones plug in so that you can listen to music while your player is in its cozy.

Hold the flap down where it will sit and position the button where you need it. Sew it on with thread, securing tightly. Weave in the end of the thread on the wrong side of your cozy.

Decorating

Decorate your cozy or give it a face and some personality if you like. I generally just use a low temperature glue gun or Gorilla glue to stick things to the cozy. Just be sure you don't use anything like safety eyes that will poke through the cozy and scratch the item you're trying to protect.

Enjoy! And as always, if you have any questions or comments feel free to post them.


Another crazy cozy. I made this one for a friend a few months back. That curly bit in the top right is just a loop of chain I made so that the cozy could be attached to things.

Tuesday, July 29, 2008

Perler Bead Coaster Tutorial

I’m in the midst of making a new set of Perler Bead Coasters right now, but my progress has been stopped by the fact that we’ve run out of black Perler beads. So while I wait for my new bag of 6,000 black beads to arrive in the mail I thought I’d try to write out a tutorial for making video game based coasters.

I know I’m not the first person to come up with this idea as Etsy will attest, but I’ve seen very few websites that actually explain how you get from a picture of your favourite video game character to a finished coaster. You can certainly use the tutorial that Sprite Stitch has provided for making video game sprites into cross stitch patterns, but honestly that’s a bit more complicated than what you need to go through for Perler Bead Coasters. Perler Beads have a much smaller colour range than DMC embroidery floss does so you don’t need to worry (or have the luxury of worrying) about colour matching as much. For the coasters you should be able to use programs or applications that came with your computer and the process if fairly simple.

A quick word about Perler Beads

Perler Beads are fuseable beads that you stick on a peg board and then melt together with a household iron to make them stick together to form a picture. Once they’ve been fused together and made into a coaster it’s perfectly safe to set hot mugs of tea, coffee, hot chocolate, etc on them, however, I would not recommend setting hot casserole dishes from the oven or pans that have been on a hot stove element on top of them. This would probably result in a melty pile of plastic goo. As well, when the coasters get dirty just wipe them down with a damp cloth and a bit of dishwashing soap (if necessary.)

Supplies

To make a set of coasters you will need:

a household iron
sheets of cork (can usually be bought by the yard at a home supply store)
strong glue (we favour Gorilla Glue)
Perler Beads
Large Perler Bead peg boards (at least 2 maybe more)

When I first started working with Perler Beads I bought the large jar that contains 11,000 beads in a mix of colours. It’s a bit of a pain to sort through it looking for the colours you need, but otherwise this has been a great investment. There are enough of each colour in the jar to make at least two coasters with each colour. That is, two coasters that use a lot of red, two coasters that use a lot of green, etc.

After buying this giant supply I now just go online and replace individual colours as I need them. I like to buy from KoolStuff4Kids, but you can also make purchases directly from the official Perler Beads website.

The large square peg boards are 29 X 29 pegs, and they interlock with each other. If you’re picture is larger than this you can hook two (or more!) together to make your design. For me it’s been hard to find the large peg boards in stores locally, and I usuallly have to buy them online. I like to have a lot of them around so that you can set up 2-3 coasters and iron them all at once, rather than one at a time.

Finding a Suitable Picture

Do you already know who you want to make a coaster of? Has someone else already done it? If you’re making a Super Mario coaster or Pac Man someone else has already done the work for you. Check places like Etsy, Craftster, or Google Images to see if you can find a finished coaster with the character you want.. If you find one you can just copy the bead placement from their finished product. Save a picture of their finished product to your computer and look at it whenever you need to.

Want to create a coaster of a character no one else has used yet. To start with you need to find the sprite for that character or a good screencap of him. Some people have favourite sprite sites that they always turn to, but I like to just put my faith in Google. For this new set of coasters I’m making the characters come from a game called Adventure Island II and III. So I started with Google Images and searched for “Adventure Island II screencap” and when I found some pictures I liked I copied them to my hard drive. I also did the same search on regular Google and checked a few of the top websites that came up. Then I also searched for “Adventure Island sprite” and again copied results I liked onto my hard drive.

Always search using keywords like “sprite” and “screencap” and do a Google web search and a Google Images search. You will often get different results. Add the name of the game the characters come from to this search using “” around the title if it’s more than one word. As well, try searching by the name of the character you’re looking for and adding the workd “sprite” or “screencap”

If you get stuck and can’t find what you’re looking for it might be a good idea to hit Wikipedia and refresh your memory about the game you’re looking for. When I was trying to find the pictures for these coasters I couldn’t find any pictures of the green triceratops from the game. I had only been searching for Adventure Island II stuff, and it turned out that the green triceratops was only a character in Adventure Island III. Knowing this earlier would have saved me a lot of time!

Telling a Good Picture from a Bad

If you’re lucky enough to get sprites of your characters these almost always translate perfectly into a Perler Bead pattern. If you only have screencaps, it can be a bit more problematic.

Open one of the pictures you’ve saved to your hard drive in any program that will allow you to view it and zoom in on it. Now Zoom in a lot, until you can see the pixels.


See the difference here? You want to use pictures that look like the Blue Dino when they’re enlarged.

Pattern Making Options

So, now you’ve got pictures of the characters you want to use. Zoom in on them until you can see the pixels at a level you’re comfortable with. It may be even bigger than what I’ve done here. When you start placing Perler Beads on your peg board each bead will represent one pixel. You can count how many pixels your character is in height and width to determine how many peg boards you will need.

There are lots of options for how you can use your pictures as your pattern. If you’re comfortable making your coasters in front of the computer than you can just open your character picture and zoom in on it until it’s the right size every time you want to place pegs on the board.

Alternatively use your computer’s screen capturing tool to take a picture of the character while it’s enlarged. Then you can just open this enlarged copy when you want to work on your coaster, or make a print out of it if you want to work on it away from the computer. Don’t have a colour printer, or don’t want to waste ink? Take a piece of graph paper and fill in squares to represent where all the black beads will go. This way you’ll just have to refer to the picture on screen when it comes time to fill in the coloured areas.

Bead Placement

Not much to say here. If your design is small enough try to start it about two or three rows away from the edges of the peg board, (which I failed to do for this one). You’ll find this makes it a little more sturdy while you’re ironing it.

Ironing

Follow the instructions that come with the Perler Beads. My boyfriend does the ironing part usually and his advice is melt the first side you iron really good to hold the beads in place and then melt the second side to a lesser degree so the beads still hold their shape. The really melted side will be covered up with cork when you’re making coasters so no one will see it. Also if you’re making a character with a lot of pointy edges like this red dino, while doing the first side, pick the iron up and set it down on the piece (for a couple of seconds) a few times, especially near the edges.

Iron a side once, let the piece cool a bit, peel back the ironing paper carefully to inspect your work. If some parts don’t seem to be fused together yet, cover the piece with ironing paper again and apply more heat where needed.

If you’re using more than one peg board then the board might try to bend a bit along the join line while you’re ironing. Be aware of this and carefully check this area to make sure the beads there are fusing together.

After you’re done ironing your character may not lay perfectly flat. If he’s curving a bit, don’t worry, adding the cork will probably fix this problem.


This photo shows the first side we ironed. Compare it with the photo at the top of the finished product. You can see the difference between the really melty side that holds the piece together, and the less melty good side in which the beads maintain more of their original shape.

Adding Cork Backings

Cut the cork so it is about 1/2 a Perler bead smaller than the character on all sides. Apply a thin layer of glue to one side of the cork board and stick it to the side of your Perler bead character that is the most melty. Place a stack of books or other heavy, flat objects on the coaster and allow it to dry for 12-24 hours. The pressure will help the coaster to stay flat.

Enjoy!

If anyone has any questions or useful tips they’d like to share, please leave a comment.

Tuesday, May 20, 2008

Ten Top Tutorials

I thought I’d do something a little different today. Consider this page a bit of a reference tool, with links to ten free tutorials that I really like. Some of these I’ve used only once, some I’ve returned to again and again, and some I’ve bookmarked for future projects. I’m not going to number them like a formal Top Ten list because there’s no best one here, they are all the best at what they do. In each case I think the person that took the time to make them did the best job of explaining the concept clearly and I hope that you’ll find them as useful as I have.

Tutorials

* The Magic Ring - For amigurumi or any project that involves circular crochet with a base chain of more than four stitches the Magic Ring is my favourite starting tool.

* The Yellow Ball (Part 1 and Part 2) - If you’ve never tried amigurumi before this is the place to start. Approximately 18 minutes of video during which the narrator walks you through the process of making a yellow ball by crocheting in spiral rounds. The camera gives a nice close up of the stitcher's hands and the narration tells you what she’s doing at every step. Finish this tutorial and you’ll have a ball that you can use as the head or body of your first amigurumi.

* The Invisible Decrease - Used in amigurumi, this kind of decrease limits the size of the gaping holes that often occur when making decrease stitches.


This penguin is made using fuzzy yarn. Pattern available from Planetjune.com

* Fuzzy Yarn Tips - How to work with fun fur and other fluffy yarns. Ideal for furry amigurumi making, but if you’re planning to use a fluffy yarn for any kind of crochet project these tips are worth reading.

* Making Hair - Two different techniques for making hair for amigurumi and other crochet dolls. One courtesy of Geek Central Station and the other from Owlishly. Test them out, you may find you’re more comfortable with one method than the other or that one is better suited to the kind of hair you want your creations to have.


The hair made on Fellowhip member Sam was created using the technique described at Geek Central Station.

This hair was created using the method described at Owlishly.

* Plastic Bag Yarn - The latest trend is creating crochet market bags to replace the less environmentally friendly plastic bags you get at the grocery store. Why not take the process one step further and turn those plastic bags into the yarn you use to make your reusable market bag?

* Pattern Charts from Video Game Sprites - Sprite Stitch explains how to convert classic 16-bit video game sprites like Mario into charted patterns that can be used with cross stitching, crochet, knitting or Perler Beads. Even if video game characters aren’t your thing there’s some good advice here. Also check out KnitPro, a free site where you can convert jpegs into gridded charts.

* Realistic Fur - How to use a pet’s slicker brush to comb out mohair and other fuzzy yarns to make realistic looking animal fur.


Wibit made this Highland Cow using the technique she describes for making realistic fur with a slicker brush.

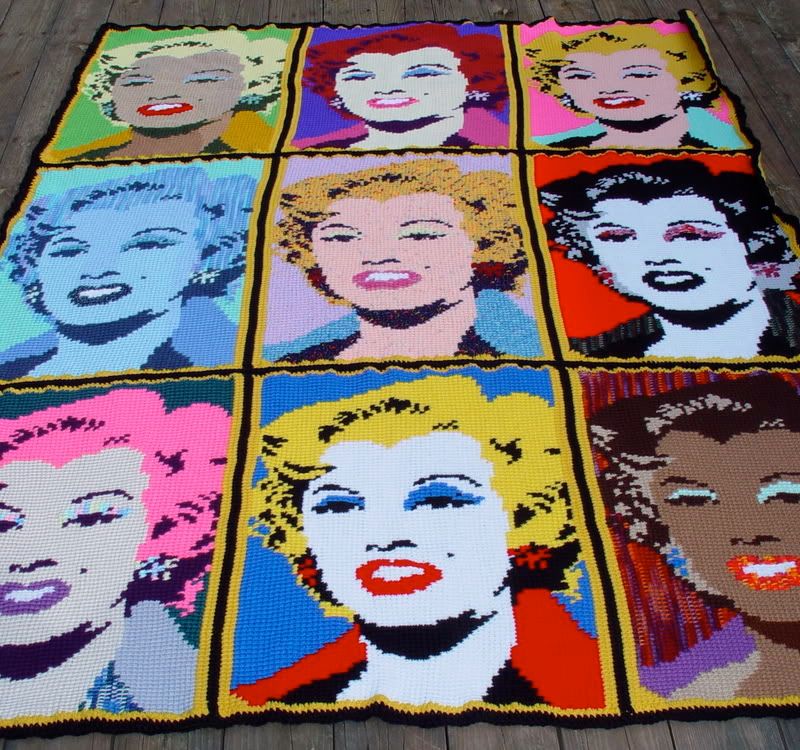
* Changing Colours in Tunisian Intarsia - Once you know how to change colours you can turn any charted picture into an afghan made in the Tunisian style.


Once you can change colours in Tunisian crochet you can make elborate picture afghans like this Marilyn Monroe Warhol Style afghan made by Pesky Pixie

* Crochet on the Double Tutorial - Similar to Tunisian crochet, this technique allows you to make coloured stripes in an afghan working with a double-ended crochet hook. A beautiful way to make baby blankets.


This sample of Crochet on the Double and the tutorial were created by Craftster member fantasticmio.